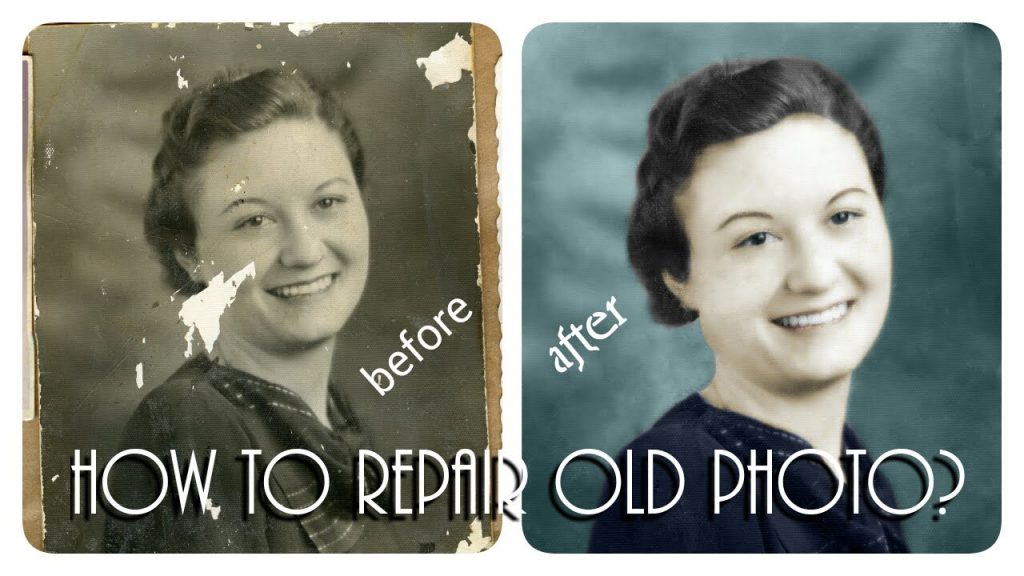
Restore Old Photos using Adobe Photoshop
Photoshop is a great tool to enhance digital images. Using Adobe Photoshop, we can also repair or restore old or damaged photographs.
Usually we noticed that in old photos the blacks become washed out, the whites go to grey and Colors fade too. However, all is not lost. Today it is possible to restore an image pretty accurately using a few simple clicks in Adobe Photoshop. You can use any version of the software. You can purchase the latest edition of the Adobe Photoshop here.
Digital Restoration is the process to inject new life into old photos & recreate vibrant new prints from old photos. And once the photo is restored, you can remove the background from the photo and change it, or make other changes too!
| Training Schedule |
|---|
-
- First of all, digitize the old photo, using a scanner.
- Once the old photo is scanned, you can open the newly scanned digital image in Photoshop.
- Then create a second copy of the image for backup purpose, using the Duplicate Layer shortcut (Control J)
- After that, Crop the image to remove the area that you don’t want. Crop tool is found by simply clicking C inside Photoshop.
- Press ENTER, Photoshop will crop out the rest of the image, leaving the area you want.
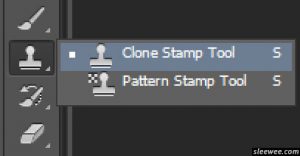
- Now we begin to patch the areas that need to be fixed. For this, we will use the Clone Stamp Tool. Before this you can check our detailed article on Clone Stamp Tool

Clone Stamp Tool - Select the Clone Stamp tool from the tool bar on the left side of the screen. It looks like the old ink stamp.
- Then set the brush size and hardness. Try with a small size like 50pixels, and you can increase or decrease the size depending on the need.
- Put the cursor in the area where we want to duplicate the pixels.
- Select the source area, Press the Alt key and move the cursor to the location where we want to take pixels from source area. Click the mouse in that location.
- Release the Alt key & move the mouse to the area where you want to do the cloning.
- Click the mouse button and paint in the target location by dragging the mouse left and right.
- This will give you a cloned area. Once this is done, we can then move on to fix the damaged spots in the image.
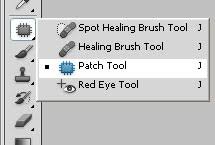
- Use the Patch Tool (looks like a small patch with threads coming out) to clean up the damaged spots in the old image.

Patch Tool - Click on the Spot Healing Brush icon to find the Patch tool hidden in the same group
- Select the Patch Tool(short cut key Shift J)
- Select Source (underneath the taskbar).
- Use the cursor to circle the damaged spot and create a selection.
- Drag the selection to a clean spot that is closest in color and appearance to the damaged spot we trying to repair. Once this is done we can now move on to retouch the image.
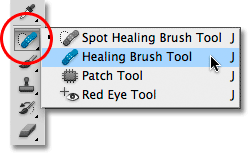
- Use the Healing Brush Tool (looks like a band-aid) to retouch the large area. This tool is fantastic to fix small spots & blemishes.

Healing Brush Tool - Click on the Healing Brush icon on the toolbox (short cut key Shift J)
- Set brush size(in pixels) using a drop-down menu in the upper right corner. You can start by 10px or 15px in the beginning and may increase or decrease as per the requirement.
- Select the Sampled option.
- Press Alt-click somewhere on the image to define a sampling point.
- Paint with the Healing Brush Tool on the damaged area. Once done we can move on to remove other imperfections to give final touch to the image.
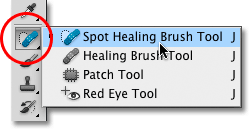
- Use Spot Healing Brush Tool to remove other blemishes & imperfection of an image. This tool does not require the sampled area to retouch. It automatically samples from around the retouched area.

Spot Healing Brush Tool - Click on the Spot Healing Brush icon on the toolbox (short cut key Shift J)
- Set the brush size using a drop-down menu in the upper right corner.
- Set brush size (in pixels) using a drop-down menu in the upper right corner. You can start by 10px or 15px in the beginning and may increase or decrease as desired.
- Choose Type: Content-Aware or Proximity Match to create a larger or more precise selection.
- Click on the spot we want to fix by dragging over imperfections in a larger area of an image.
Restore Old Photos using Adobe Photoshop
If you want to attend Photoshop Training in Singapore, you can visit the Adobe Photoshop Certification Training and avail Government Grants for Adobe Photoshop in Singapore.
If you have any questions on the videos, or a problem you are facing on Adobe Photoshop, you can email them to us, and we will be glad to answer your queries in our future videos.
Thanks.
Cheers,
Vinai Prakash,
Founder & Principal Trainer at Intellisoft Training Pte Ltd.
We are an Authorized Training Organization by the SkillsFuture Singapore (Currently SSG. Formerly WDA).